
Freeze Soup Base for 30-Minute Dinners: Mirepoix Freezer Blocks That Make Meal Prep Easy
There’s a big difference between freezing soup and freezing the part that actually makes soup taste good. Instead of filling your freezer with full containers of the same finished meal, you can freeze concentrated soup base blocks (aromatics, fat, and spices) ready to turn into completely different dinners on demand.
A sautéed mirepoix blended with the right spice combo becomes a flexible flavor foundation. Drop one frozen block into a pot with broth, protein, and whatever starch you have on hand, and dinner is moving in under five minutes. No chopping. No long simmer to build depth. Just structure you prepared once and use repeatedly.
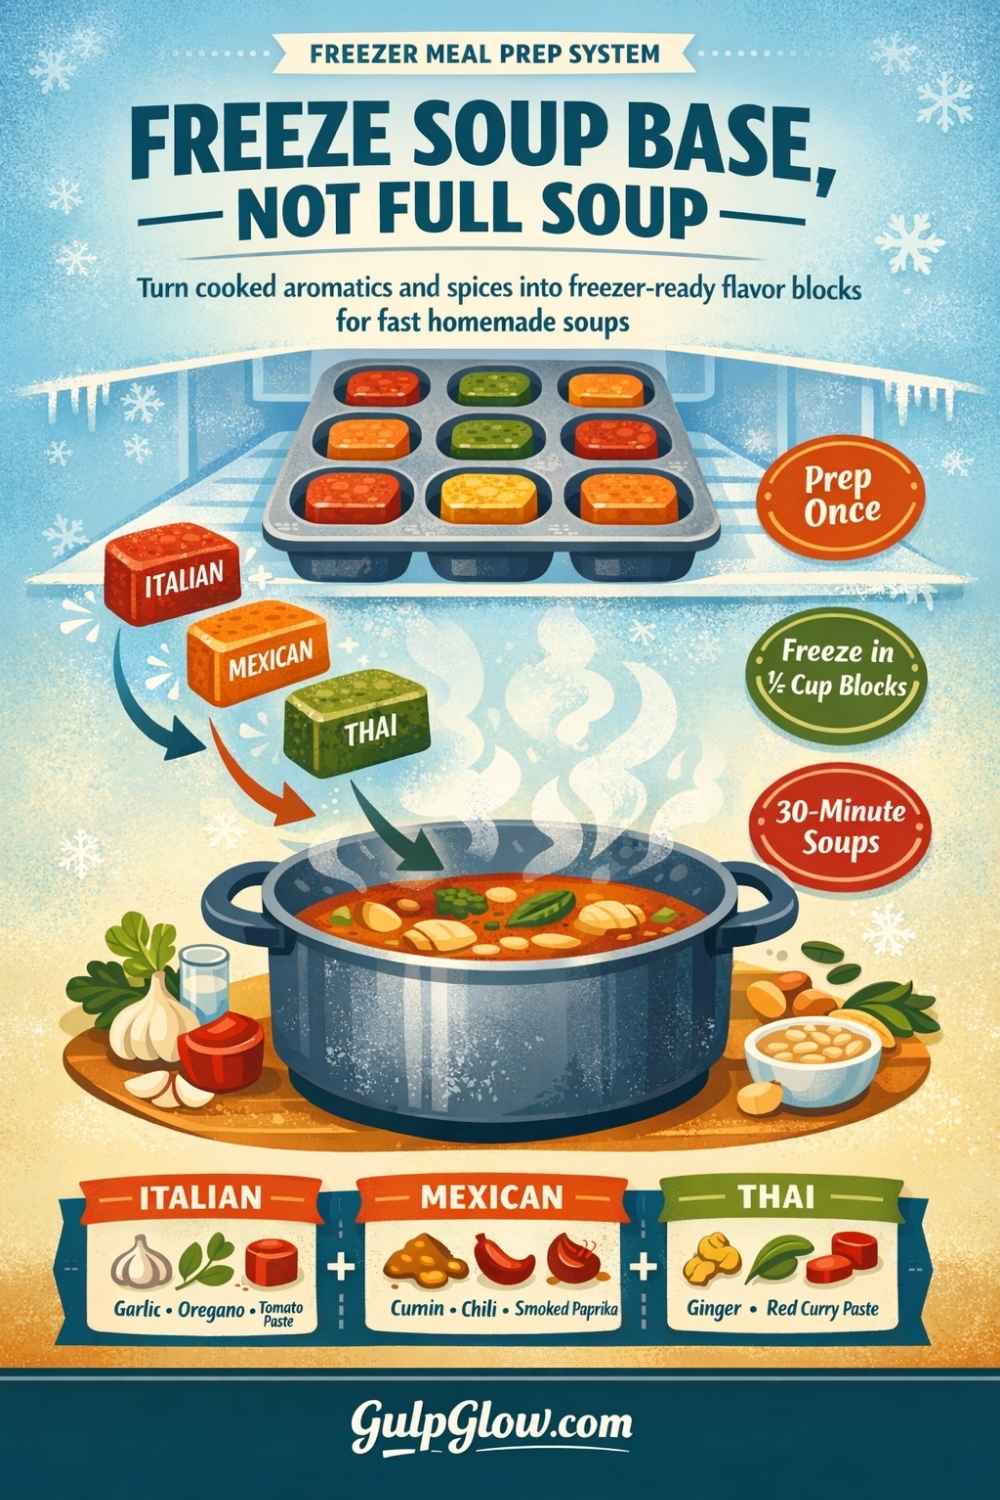
In this guide, you’ll learn how to freeze soup base the smart way: the right mirepoix ratios, Italian/Mexican/Thai flavor variations, portioning in muffin tins for consistency, and a labeling system that keeps your freezer organized instead of mysterious. The result isn’t just meal prep. It’s a modular system that turns one prep session into weeks of 30-minute dinners.
Why Freeze Soup Base Instead of Full Soup?
Freezing full soup sounds efficient, but it locks you into one outcome. A pot of soup becomes several identical meals, and not all soups reheat well. Pasta turns soft, potatoes break down, and textures flatten over time.
Freezing the base instead keeps things flexible. You’re storing the part that takes the longest to build—flavor—while leaving the final structure open. One base can turn into a creamy soup one night, a brothy one the next, or something with rice, noodles, or beans depending on what you need.
There’s also a practical advantage. Soup bases take up less space and stack better than full containers. Instead of large tubs, you’re working with compact portions that are easy to grab and use.
This shifts meal prep from repetition to variation. You’re not reheating leftovers—you’re assembling fresh meals quickly.
What a Soup Base Actually Is
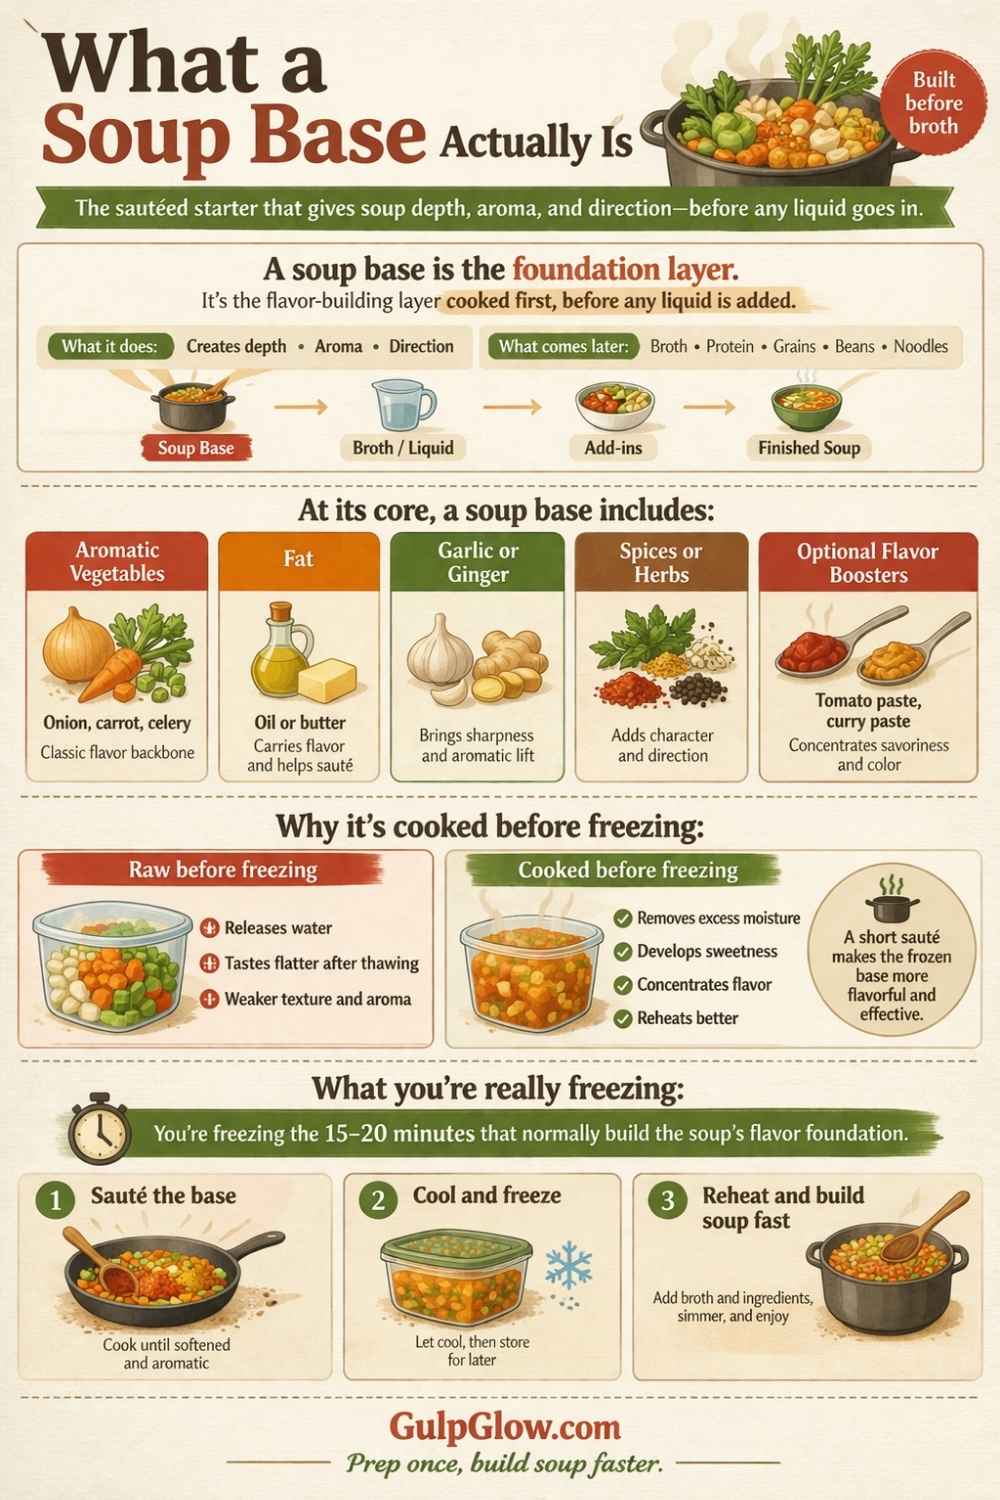
A soup base is the foundation layer of a soup, built before any liquid is added. It’s where depth, aroma, and direction come from.
At its core, it includes:
- Aromatic vegetables (like onion, carrot, celery)
- Fat (oil or butter)
- Garlic or ginger
- Spices or herbs
- Optional elements like tomato paste or curry paste
When these ingredients are cooked together, they create a concentrated flavor base that defines the entire dish. Everything added later—broth, protein, grains—builds on that foundation.
The key detail is that the base is cooked before freezing. Raw vegetables release water and taste flat after thawing. A short sauté removes excess moisture and develops sweetness, making the base much more effective when reheated.
Think of it this way: you’re freezing the part that normally takes 15–20 minutes to build properly.
The Core Base: Mirepoix That Freezes Well
Most soup bases start with a variation of mirepoix, a simple but effective combination of vegetables that creates balance without overpowering the dish.
The standard ratio is:
- 2 parts onion
- 1 part carrot
- 1 part celery
This works because each ingredient plays a specific role. Onion provides depth, carrot adds subtle sweetness, and celery brings a savory backbone that ties everything together.
When cooked gently in oil or butter, this mixture softens and concentrates. The vegetables release moisture, sugars develop, and the base becomes cohesive. That’s what you want to freeze—not raw pieces, but a unified flavor layer.
You can adjust the mix slightly depending on what you cook often. Adding bell pepper creates a Cajun-style variation. Increasing garlic shifts it toward a more savory profile. But the core idea stays the same: build a balanced base that works across multiple dishes.
Once this foundation is set, you can take it in completely different directions with spices and aromatics.
Flavor Upgrade: Turn One Base Into Multiple Cuisines
A plain mirepoix base is useful, but adding spices before freezing turns each block into a ready-made direction. This is where the system becomes powerful. You are not just saving time—you are deciding the flavor in advance.
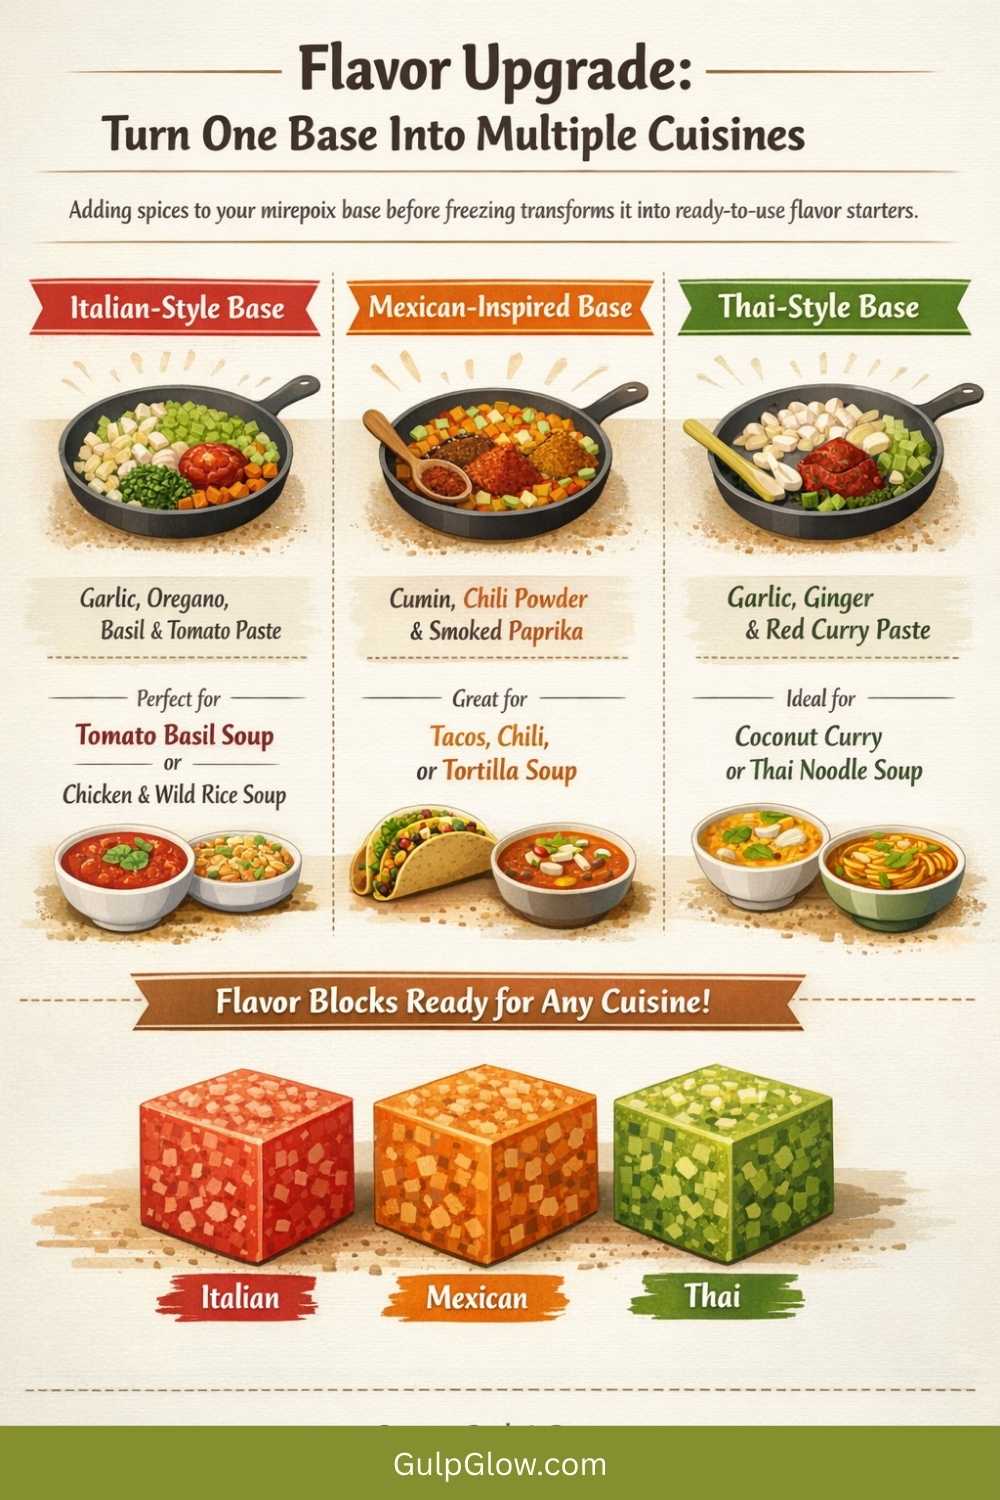
Instead of one neutral base, think in terms of small batches with different identities.
Italian-style base
Start with your mirepoix, then add garlic, dried oregano, basil, and a spoon of tomato paste. Cook until the tomato paste darkens slightly and everything smells cohesive.
This base leans savory and slightly sweet. It works naturally for dishes like Tomato Basil Soup or a variation of Chicken and Wild Rice Soup where you want depth without heaviness.
Mexican-inspired base
Build from onion, carrot, and celery or bell pepper. Add garlic, cumin, chili powder, and smoked paprika.
The result is warmer and more aromatic. It gives you a base that can go in a brothy direction or something thicker depending on what you add later.
Thai-style base
Use onion or shallot, then add garlic, ginger, and red curry paste. If you have lemongrass, include it at this stage.
This base is more fragrant than heavy. It works especially well with coconut milk, noodles, or lighter vegetable-forward soups.
The key idea is simple: each block should already “know” what kind of soup it wants to become.
The Cooking Step Before Freezing
This step determines whether your base works or falls flat later.
Start by heating oil in a pan over medium heat. Add your vegetables first and cook until they soften and become slightly translucent. You are not aiming for deep browning, but you do want to remove the raw edge and concentrate their flavor.
Once the vegetables are ready, add garlic and spices. Let them cook briefly until fragrant. This is where the flavor blooms. If you add them too early, they burn. Too late, and they stay sharp and underdeveloped.
If your base includes tomato paste or curry paste, give it a minute or two in the pan. It should darken slightly and smell richer. That small change makes a noticeable difference in the final soup.
Before portioning, let the mixture cool. Freezing it while hot creates condensation, which leads to ice crystals and a weaker texture when reheated.
This step is what separates a useful base from a forgettable one. It does not take long, but it does need attention.
Portioning: Muffin Tins, Consistency, and Control
Once your base is cooked and cooled, portioning becomes the system that makes everything easy later.
A standard muffin tin works well because each section holds about half a cup. That gives you a consistent unit you can rely on when cooking. You are no longer guessing how much to use.
Fill each section evenly, then freeze until solid. Once frozen, remove the blocks and store them in a sealed bag or container.
Silicone trays make removal easier, but a regular muffin tin works if you let the blocks sit for a minute before popping them out.
The benefit here is not just convenience. It is control. When each block is the same size, your soups become predictable. One block equals one starting point. From there, you build the rest of the meal without overthinking it.
Labeling System That Prevents Freezer Guesswork
Freezer prep only works if you can recognize what you made. Once everything is frozen into similar-looking blocks, it becomes surprisingly easy to lose track.
At a minimum, label each batch with:
- Flavor (Italian, Mexican, Thai)
- Date
- Portion size (for example, ½ cup blocks)
That alone solves most confusion. But if you want this system to stay useful over time, add a simple visual layer.
Use color coding. A small piece of colored tape on the container or bag works well:
- Green for Italian
- Red for Mexican
- Yellow for Thai
Now you can grab what you need at a glance.
One small upgrade that helps even more is keeping a running list of what is in your freezer. It does not have to be formal. A note on your phone is enough. This prevents doubling up on one flavor while forgetting another exists.
The goal is not organization for its own sake. It is speed when you are deciding what to cook.
How to Turn a Block Into a 30-Minute Dinner
Using the base should feel almost automatic. You are not following a strict recipe. You are assembling a structure.
Start with one frozen block in a pot. Add about four cups of broth and bring it to a simmer. As it heats, the base melts and distributes its flavor.
From there, build the soup based on what you have available.
A simple working formula looks like this:
- 1 base block
- Broth
- Protein (chicken, beans, sausage, tofu)
- Starch (rice, pasta, potatoes)
- Optional greens or herbs
Once everything is in the pot, let it simmer until the starch is cooked and the flavors come together. In most cases, that takes 15 to 20 minutes.
The important shift is this: you are not starting from zero. The hardest part, building flavor, is already done.
Real 30-Minute Soup Builds
To make this system practical, it helps to see how one block turns into a finished dish.
Italian base → Chicken and Wild Rice
Start with an Italian block. Add broth, cooked or raw chicken, and wild rice. Let it simmer until the rice is tender.
Finish with herbs and, if you want, a small amount of cream.
This gives you a streamlined version of Chicken and Wild Rice Soup without the long prep time.
Italian base → Tomato soup
Use the same base, but instead of adding protein, pour in crushed tomatoes and a bit of broth. Simmer briefly, then blend until smooth.
Finish with fresh basil.
You now have a quick version of Tomato Basil Soup built from the same starting point.
Mexican base → Chicken lime soup
Add broth and shredded chicken to a Mexican-style block. Let it simmer, then finish with lime juice and cilantro.
The base already contains the spices, so the rest of the soup comes together quickly.
These examples are meant to show flexibility. One base can support multiple outcomes without feeling repetitive.
Storage, Shelf Life, and What to Avoid
Once your soup base blocks are frozen and stored properly, they hold up well for everyday use. The key is protecting both flavor and texture.
Store the blocks in airtight containers or well-sealed freezer bags. This prevents freezer burn and keeps them from absorbing odors from other foods. If possible, keep similar flavors grouped together so you are not digging through mixed bags every time.
For best results, use the blocks within 2 to 3 months. They will still be safe beyond that, but the flavor becomes less sharp over time.
A few things are better left out of the base stage:
- Dairy can separate after freezing
- Potatoes tend to become grainy
- Delicate herbs lose their freshness
These ingredients are better added during the final cooking step.
Also, always let the base cool fully before freezing. Warm mixtures create condensation, which leads to ice crystals and weaker texture later.
Why This Works Better Than Traditional Meal Prep
Traditional meal prep often means committing to full dishes in advance. That works for convenience, but it limits variety. After a couple of days, the same meal can start to feel repetitive.
Freezing soup base shifts the approach. Instead of storing finished meals, you store possibilities.
You prep once, but you decide later:
- What protein to use
- Whether the soup is brothy or creamy
- Which starch or vegetables to include
This flexibility makes it easier to keep cooking at home without feeling locked into a plan.
It also reduces waste. You use what you have on hand instead of reheating something you are not in the mood for.
The result is a system that supports real cooking, not just reheating.
Summary: A Simple System That Keeps Working
The idea is straightforward:
Cook a flavorful base once.
Portion it into consistent blocks.
Freeze it with clear labels.
Use it when you need it.
From there, everything becomes easier. A single block gives you a head start on dinner, cutting out the most time-consuming part of the process.
If you keep a small mix of flavors in your freezer, you are never starting from zero. You are building on something that is already done.
That is what makes this approach stick. It is not just efficient. It is flexible enough to use again and again without getting boring.