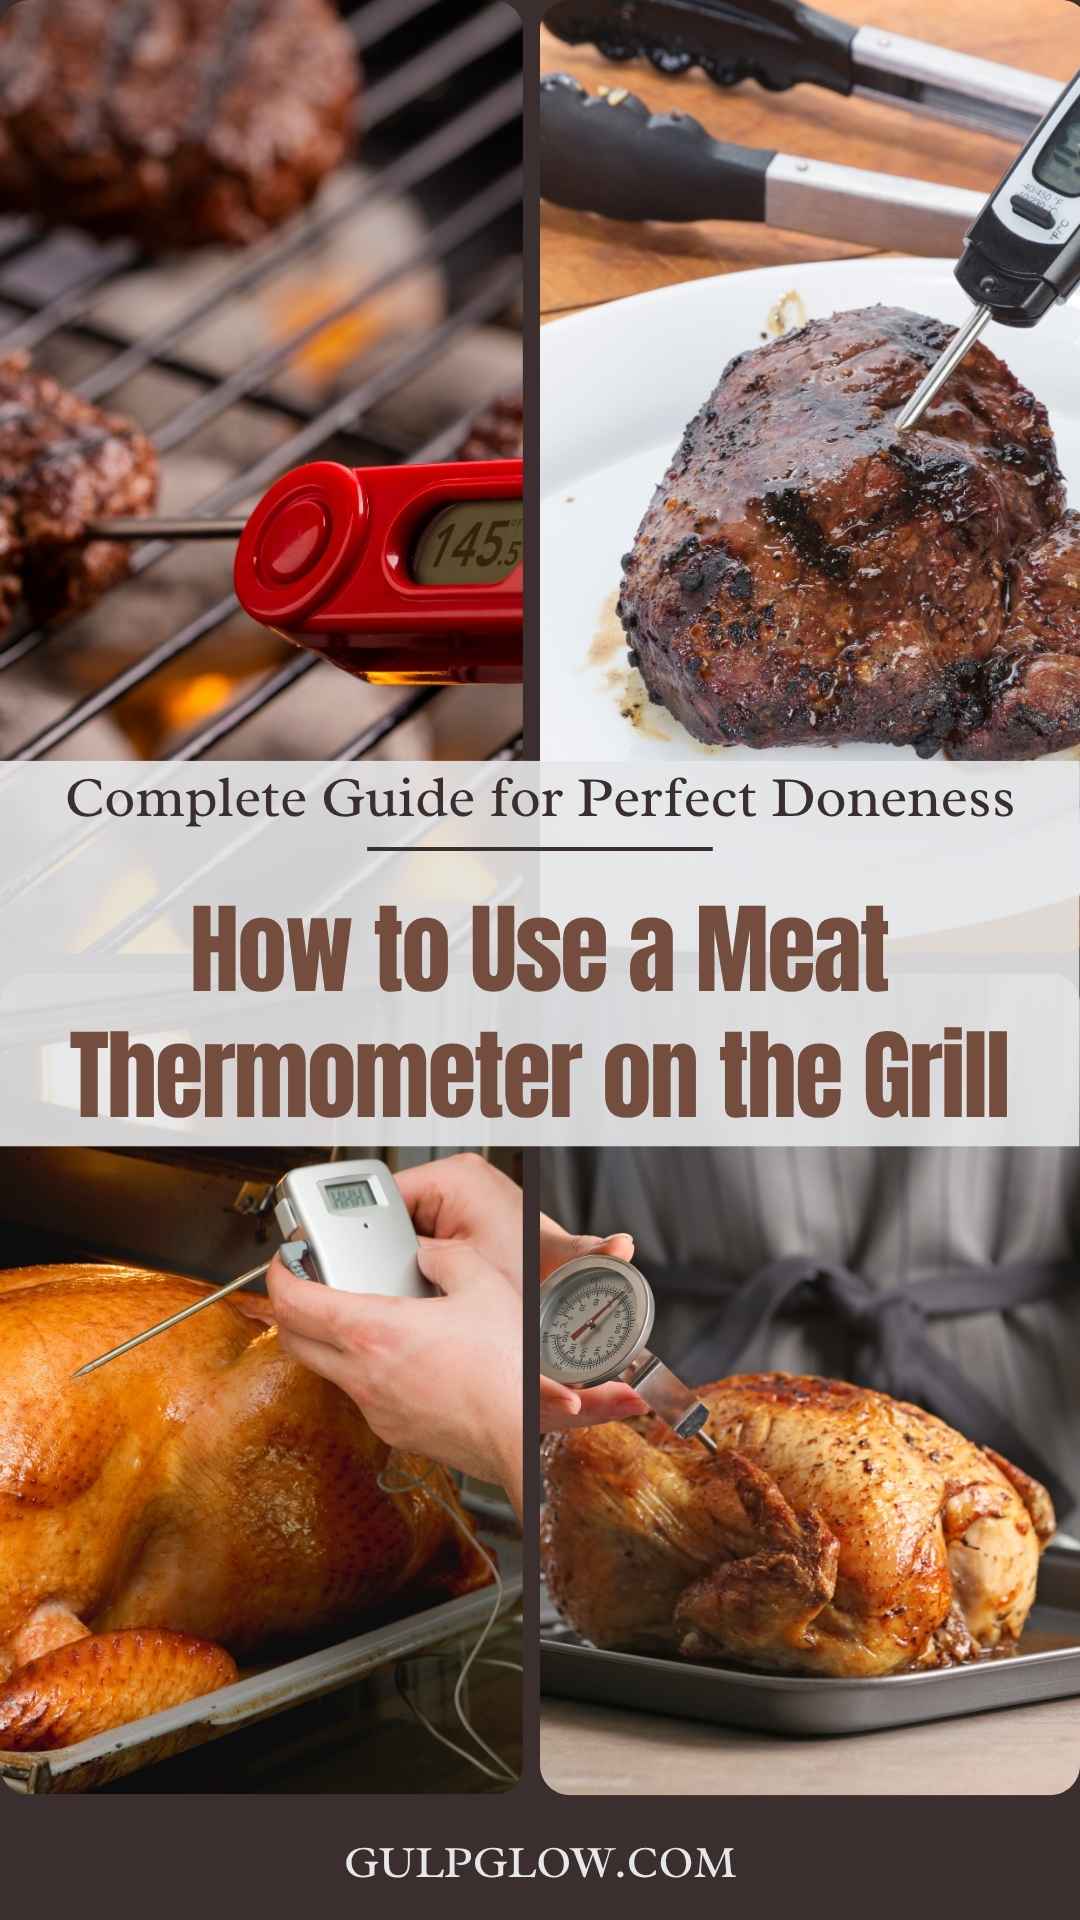
How to Use a Meat Thermometer on the Grill: A Complete Guide for Perfect Doneness
Grilling is a blend of art and science—but when it comes to knowing exactly when your meat is done, guesswork simply isn’t enough. Whether you’re aiming for a juicy medium-rare steak or safely cooked chicken, the secret weapon in any grill master’s toolkit is a meat thermometer.
Gone are the days of cutting into meat to “check” for doneness or relying on vague color cues. A meat thermometer offers precision, safety, and confidence, ensuring your food is not only flavorful but also cooked to the correct internal temperature. It’s the easiest way to avoid dry overcooked meals or dangerous undercooked bites.
In this guide, we’ll walk you through everything you need to know about using a meat thermometer on the grill—from choosing the right type and proper placement, to reading temperatures, avoiding common mistakes, and ensuring your meat is grilled to perfection every time.
Types of Meat Thermometers
Not all thermometers are created equal. Choosing the right one for your grilling style and meat type is the first step toward perfectly cooked results. Let’s look at the main types and how they’re best used.
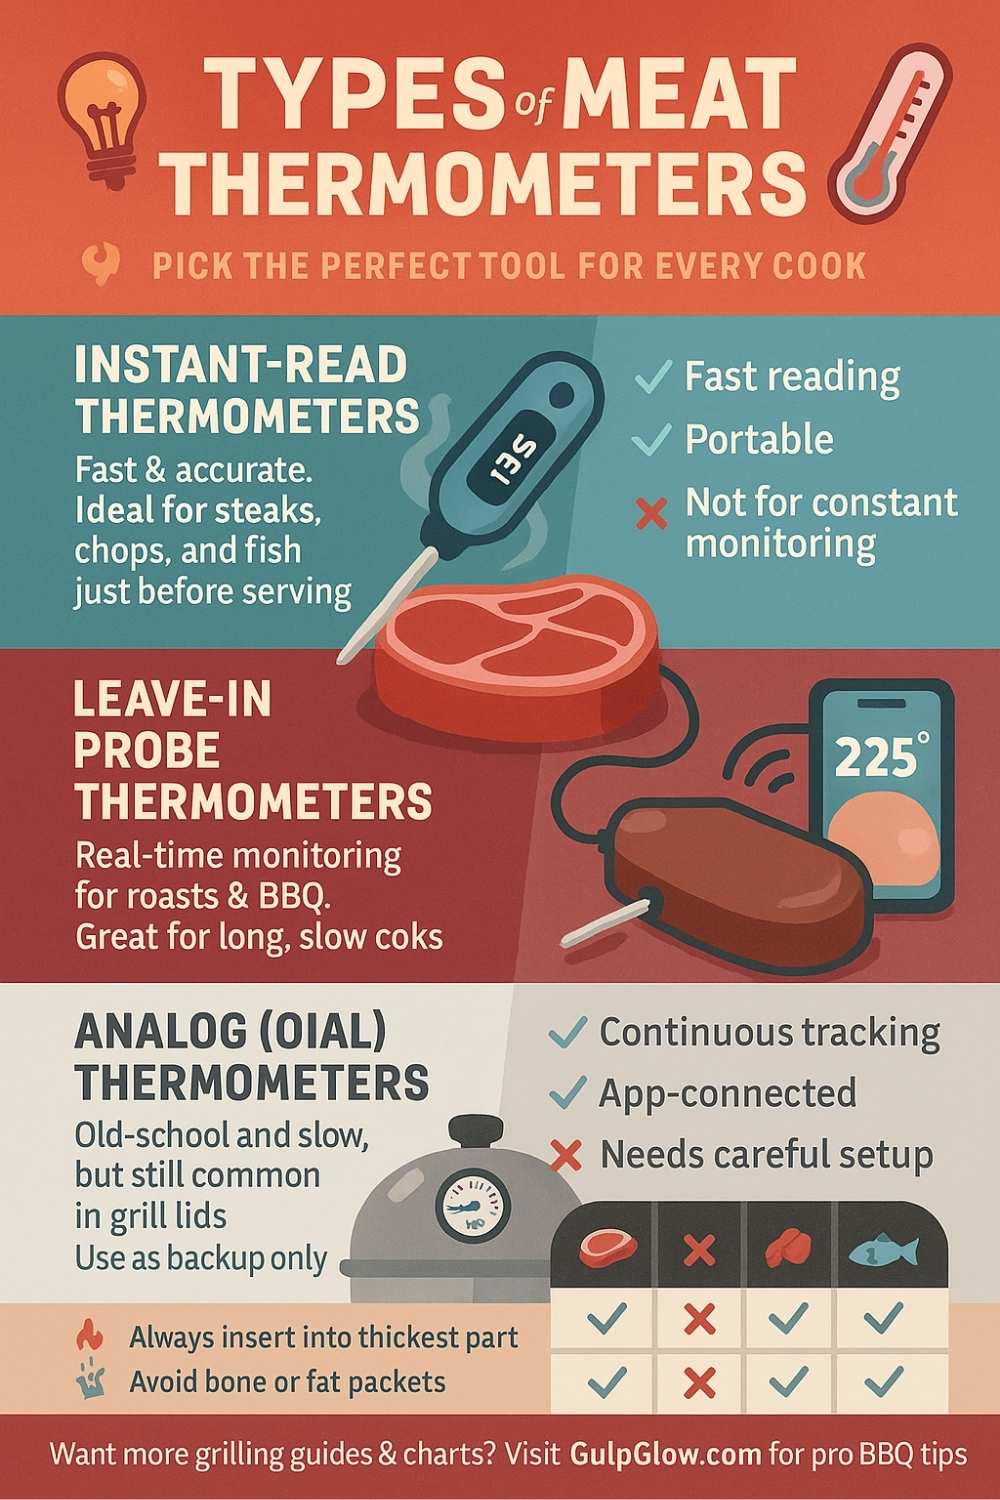
Instant-Read Thermometers
These are the most common and user-friendly thermometers for grilling. As the name suggests, they provide a fast temperature reading—usually within 3 to 10 seconds.
Best for:
- Steaks, burgers, pork chops, and fish
- Quick temperature checks right before serving
Advantages:
- Fast and accurate
- Compact and portable
Limitations:
- Must be inserted manually
- Not suitable for ongoing monitoring
Leave-In Probe Thermometers
These thermometers include a wired or wireless probe that stays in the meat while it cooks, allowing you to monitor the temperature in real-time without lifting the grill lid.
Best for:
- Roasts, brisket, whole poultry
- Low-and-slow BBQ or smoking
Advantages:
- Continuous monitoring
- Often paired with apps or alarms
Limitations:
- Slightly more expensive
- Wires must be managed carefully over flames
Analog (Dial) Thermometers
Though less common today, dial thermometers still show up in built-in grill lids or budget kitchen tools. They use a mechanical coil to show internal temp.
Best for:
- Backup or built-in checks
Limitations:
- Slower and less precise
- Difficult to read in low light
Comparison at a Glance
| Type | Speed | Accuracy | Best Use |
|---|---|---|---|
| Instant-Read | 3–10 sec | High | Steaks, burgers, quick checks |
| Leave-In Probe | Ongoing | Very High | Roasts, BBQ, whole poultry |
| Analog Dial | 30–60 sec | Moderate | Built-in lid or backup only |
Calibration and Accuracy
Even the best thermometer won’t help if it’s inaccurate. Over time, drops, heat exposure, or factory issues can throw off readings. That’s why calibrating your thermometer is a smart habit to ensure consistent results.
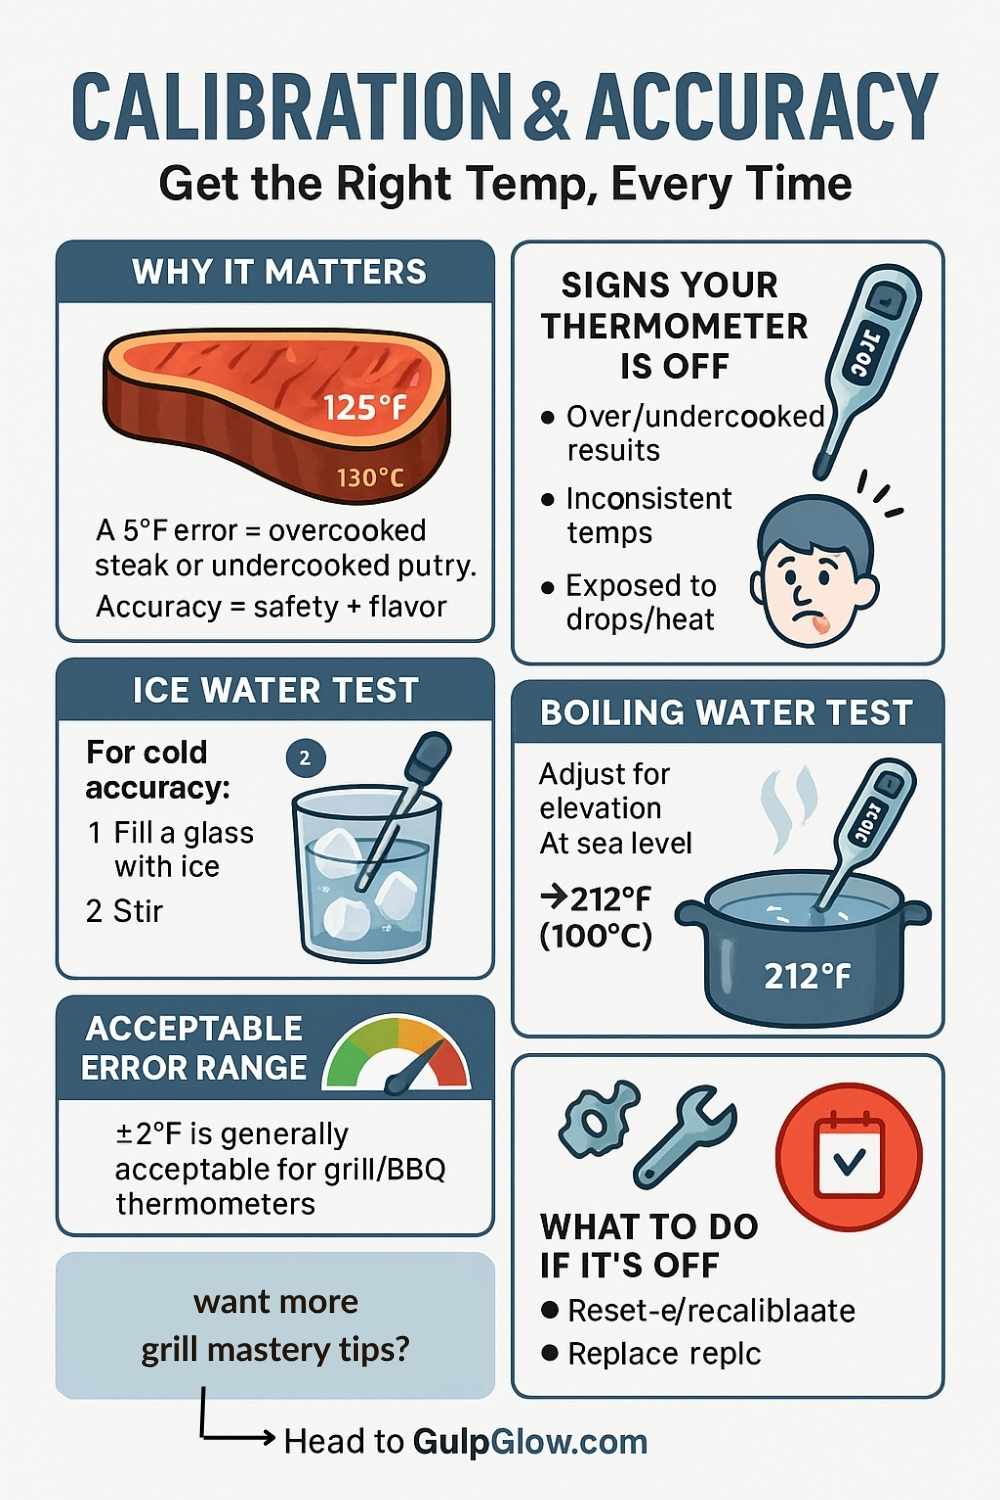
Why Calibration Matters
Just a 5°F (3°C) error can mean the difference between perfectly medium-rare and dry, overcooked steak—or worse, unsafe poultry. Checking accuracy regularly (monthly or before big cooks) gives peace of mind and better food.
Ice Water Test (for Cold Accuracy)
- Fill a glass with ice and top with cold water.
- Stir and let sit for 1–2 minutes.
- Insert the thermometer into the water without touching the sides or bottom.
- Wait for a steady reading—it should say 32°F (0°C).
- If it’s off, adjust using the reset button (on digital models) or consult your manual.
Boiling Water Test (for Hot Accuracy)
- Boil water in a pot.
- Insert the thermometer in the center (no pot contact).
- It should read 212°F (100°C) at sea level. Adjust for altitude if needed.
Both tests help verify your thermometer is within an acceptable range—usually ±2°F. If not, recalibrate or replace it.
Proper Probe Placement
Where you place your thermometer probe can make or break your reading. Insert it incorrectly, and you might hit a bone or air pocket—leading to false results. Here’s how to do it right for each type of meat.
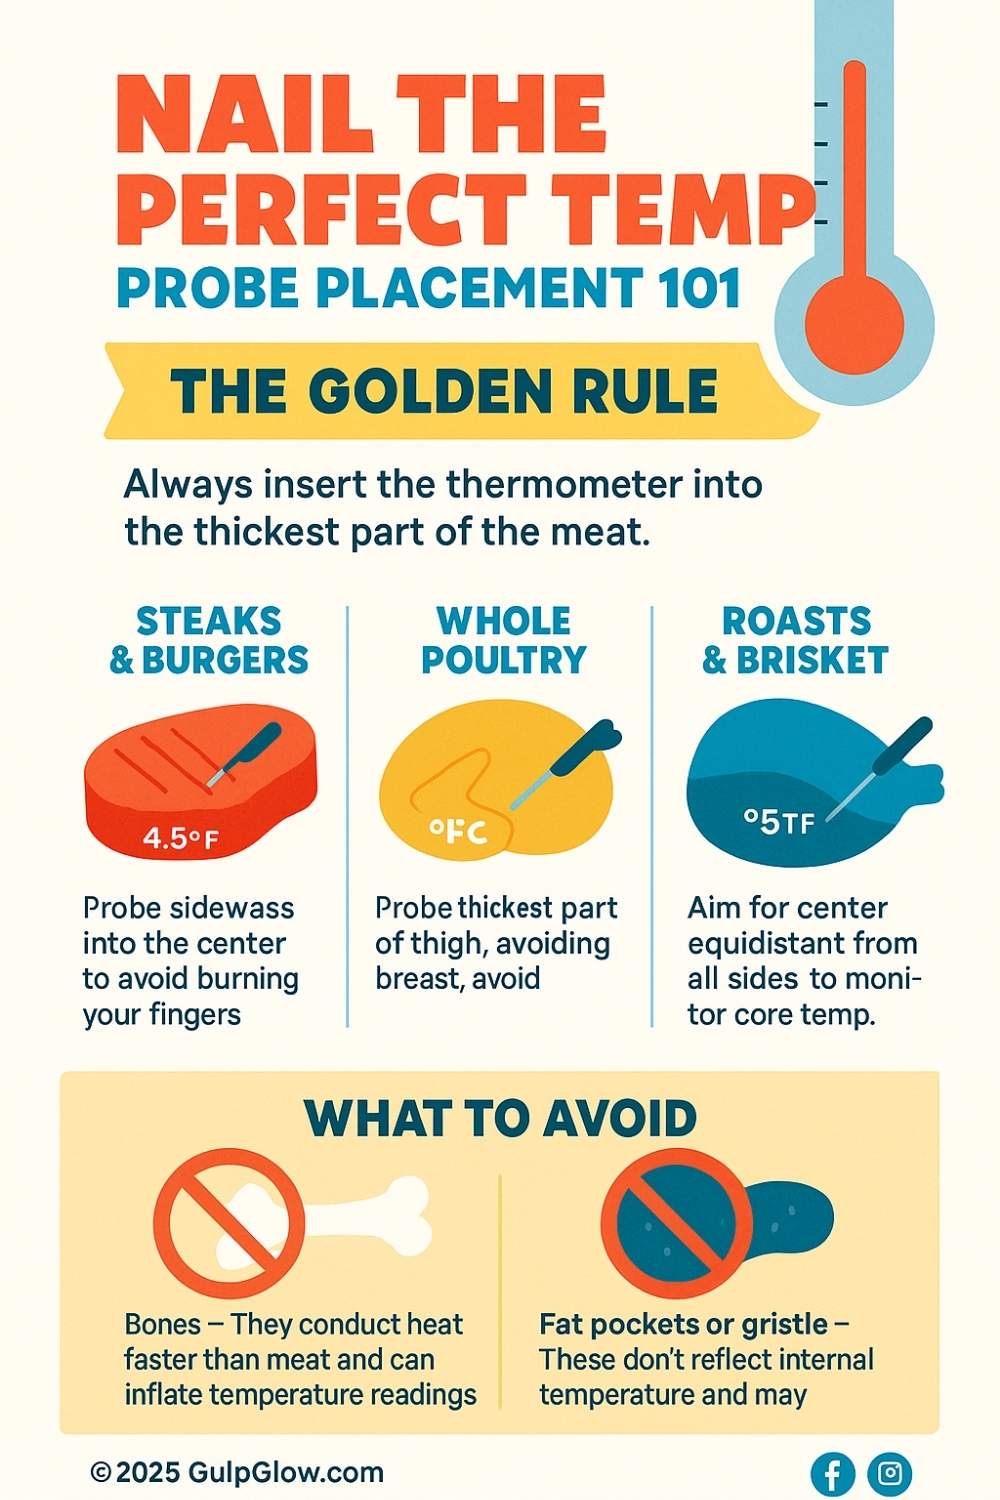
The Golden Rule
Always insert the thermometer into the thickest part of the meat, as this area is the slowest to cook and will give the most accurate representation of doneness.
What to Avoid
- Bones – They conduct heat faster than meat and can inflate temperature readings.
- Fat pockets or gristle – These don’t reflect internal temperature and may give false results.
- Shallow insertion – For digital probes, insert at least to the marked notch on the shaft (if present).
Placement by Meat Type
- Steaks & Burgers: Insert sideways into the center to avoid burning your fingers and reach the most accurate middle point.
- Whole Poultry: Probe the thickest part of the thigh, not the breast, avoiding bone.
- Roasts & Brisket: Aim for the center, equidistant from all sides, to monitor core temperature.
Taking the time to insert your thermometer correctly ensures you’re reading the actual internal temperature—not a misleading surface or fat temp.
How to Read Temperatures While Grilling
Using a meat thermometer during grilling isn’t just about inserting it and reading a number—timing, technique, and thermometer type all affect how and when to get the most accurate reading.
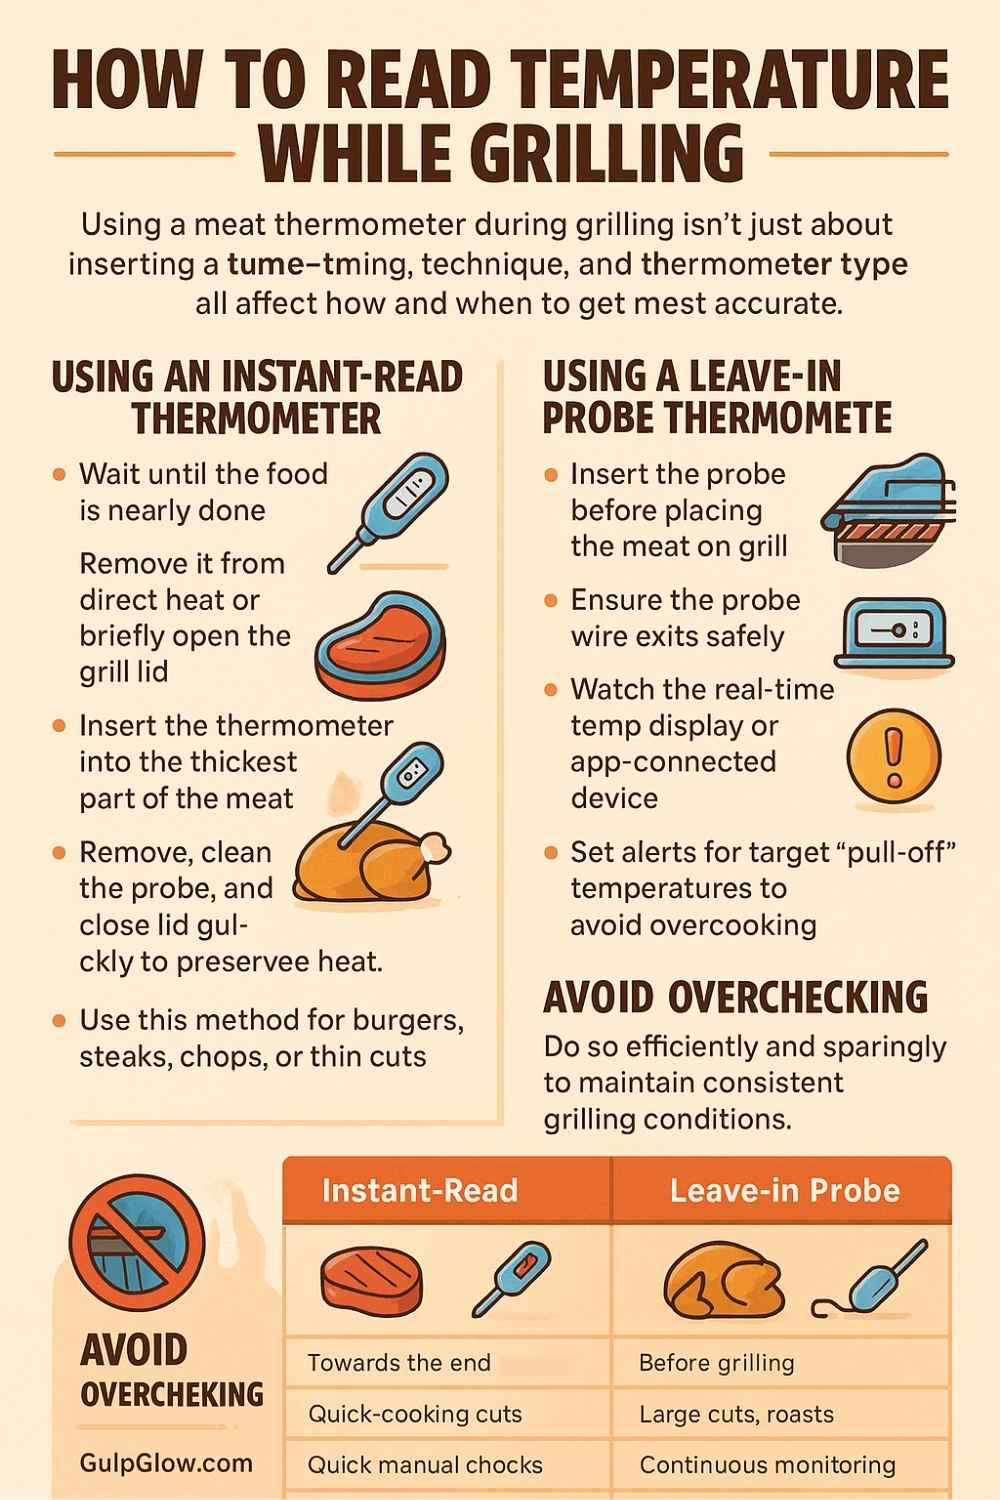
Using an Instant-Read Thermometer
Instant-read thermometers are designed for quick, manual temperature checks toward the end of cooking. Here’s how to use one correctly:
- Wait until the food is nearly done.
- Remove it from direct heat or briefly open the grill lid.
- Insert the thermometer into the thickest part of the meat.
- Hold for 3–10 seconds until the numbers stabilize.
- Remove, clean the probe, and close the lid quickly to preserve heat.
Use this method for burgers, steaks, chops, or thin cuts where cooking happens quickly and consistent temperature checks are necessary.
Using a Leave-In Probe Thermometer
If you’re grilling large items like roasts, briskets, or whole chickens, a leave-in thermometer gives you continuous monitoring without opening the lid.
- Insert the probe before placing the meat on the grill.
- Ensure the probe wire exits safely—preferably through a vent or under the lid edge.
- Watch the real-time temp display or app-connected device.
- Set alerts for target “pull-off” temperatures to avoid overcooking.
This hands-off approach keeps cooking temps steady and lets you monitor multiple meats if needed.
Avoid Overchecking
Every time you lift the lid, you release heat and slow the cook. Whether you’re using an instant-read or checking a probe thermometer, do so efficiently and sparingly to maintain consistent grilling conditions.
Carryover Cooking Explained
One of the most overlooked grilling factors is carryover cooking—the process by which meat continues to cook after it’s been removed from the heat source.
What Is Carryover Cooking?
When meat comes off the grill, the internal temperature continues to rise as heat moves from the outer layers inward. This can increase the temperature by 5–10°F depending on the size and thickness of the cut.
If you wait until your thermometer reads the final “done” temperature on the grill, you’re likely overcooking the meat.
How to Use It to Your Advantage
- Pull meat off the grill slightly below the target temp.
- Tent it loosely with foil to rest and finish cooking evenly.
- Resting times vary: 5 minutes for small cuts, up to 20 minutes for large roasts.
Example Carryover Guide
| Meat Type | Target Temp | Pull-Off Temp | Rest Time |
|---|---|---|---|
| Steak | 135°F | 130°F | 5 min |
| Chicken | 165°F | 160°F | 5–10 min |
| Pork Roast | 145°F | 140°F | 10–15 min |
| Brisket | 203°F | 195–198°F | 15–30 min |
Factoring in carryover cooking ensures your meat is safe, flavorful, and never dry.
Meat Temperature Doneness Chart
To grill confidently, you need a cheat sheet for safe and delicious doneness levels. Here’s a helpful chart showing the ideal internal temperatures for various meats—along with the best point to pull them from the grill.
| Meat Type | Doneness | Final Temp (°F) | Pull-Off Temp (°F) |
|---|---|---|---|
| Beef Steak | Rare | 125 | 120 |
| Medium-Rare | 135 | 130 | |
| Medium | 145 | 140 | |
| Well-Done | 160 | 155 | |
| Chicken (Whole/Breast) | Safe Cooked | 165 | 160 |
| Ground Chicken | Fully Cooked | 165 | 160 |
| Pork Chops/Roast | Medium | 145 | 140 |
| Ground Pork | Safe Cooked | 160 | 155 |
| Fish | Flaky/Tender | 145 | 140 |
| Brisket/BBQ Cuts | Fall-Apart | 203 | 195–198 |
Note: Always use a food thermometer—doneness by look or touch is never fully reliable, especially with poultry and ground meats.
Cleaning and Maintenance
To keep your meat thermometer working properly—and safely—it’s crucial to clean and maintain it regularly. This not only ensures accurate readings but also prevents cross-contamination and extends the life of your tool.
Cleaning After Each Use
- Wipe the probe with a paper towel immediately after removing it from meat.
- Wash with warm soapy water, especially if it contacted raw poultry or pork.
- Rinse and dry thoroughly to prevent water damage or rusting.
For digital thermometers, avoid immersing the display or probe base in water. Wipe with a damp cloth instead.
Sanitizing Between Uses
- Use a disinfecting wipe or dip the metal tip in boiling water for 30 seconds.
- For extra safety during cookouts, especially when handling multiple types of meat, have a backup probe or use color-coded tools.
Storage Tips
- Store in a dry, cool place away from moisture and direct heat.
- For wired probes, wrap cords loosely to avoid crimping or internal damage.
- Remove batteries from digital models during long-term storage to prevent corrosion.
Regular care keeps your thermometer dependable and safe for every grilling session.
Special Tips for Grill Use
Grilling brings its own set of challenges when using thermometers—flames, heat zones, and space management. Here are specific techniques to ensure smooth usage on the grill.
Protect Your Equipment
- For leave-in probes, thread wires through grill vents or under the lid to avoid pinching.
- Wrap probe cables in foil where exposed to prevent melting or singeing.
- Keep digital units away from direct flames—place them on side tables or shelves.
Side Insertion for Thin Cuts
For items like burgers or small steaks, inserting the probe sideways is more accurate than from the top. This helps hit the center of the meat for a precise reading without going too deep or shallow.
Avoid Temperature Saboteurs
- Don’t press or flatten meat with tongs—it forces out juices and affects temp.
- Don’t open the lid too often when using leave-in probes—this drops grill temp and extends cooking time.
- Use preset temperature alarms on wireless models to alert you without constant checking.
These tricks make using a thermometer on the grill smoother and more effective—especially during busy cookouts or long BBQ sessions.
Safety and Food Quality
A meat thermometer isn’t just a gadget—it’s a food safety essential. Using one properly can prevent foodborne illnesses and ensure that your dishes are both delicious and safe.
Preventing Undercooked Food
- Poultry must reach 165°F to kill salmonella.
- Ground meats like burgers should hit 160°F due to bacterial risk on the surface.
- Fish and pork should be checked with a thermometer—not just eyeballed.
Skipping the thermometer or guessing by color puts you and your guests at risk. Always verify with a trusted device.
Avoiding Overcooking
Just as important, thermometers help prevent dry, chewy meat. Knowing when to pull food off the grill—even 5°F early—makes all the difference in taste and texture.
Consistent Results Every Time
A thermometer brings consistency. Whether you’re cooking one steak or twenty burgers, you’ll deliver the same doneness level time after time—earning the trust of family and friends with every meal.
Final Tips & Common Mistakes to Avoid
To round out your thermometer know-how, here’s a list of quick tips and the most common errors to steer clear of:
Final Tips:
- Calibrate monthly for best results.
- Let meat rest after cooking—carryover heat matters.
- Use probe alarms for long BBQ sessions.
Avoid These Mistakes:
- Don’t rely on color or juice appearance.
- Don’t reuse probes without cleaning.
- Don’t cook blindly without checking final temps.
Mastering your meat thermometer transforms grilling from guesswork into precision—and makes you the go-to grill master in your circle.