Clear Ice at Home—No Fancy Molds: A Step-by-Step Directional Freezing Guide
Cloudy ice melts fast, tastes like freezer, and turns an Old Fashioned or highball into a slushy shrug. Clear ice, on the other hand, looks like glass, chills longer, and keeps flavors sharp from first sip to last. You don’t need pricey molds or a dedicated ice machine to get there—you need directional freezing.
Directional freezing is a simple trick: make water freeze from one direction so air and impurities are pushed away from the part you’ll use. A small picnic cooler (lid off) in a normal freezer does the job. Freeze, pop out a clear slab, cut it into cubes or spears, and you’ve got bar-ready ice at home. Along the way, we’ll handle the details that actually matter: how full to fill the cooler, when to stop freezing, how to release the block cleanly, and how to cut without shattering edges.
We’ll also cover what most guides skip: safe cutting setups, storage that prevents odor and frost, and tempering so your cubes don’t crack the moment liquid hits them. By the end, you’ll have a repeatable workflow that turns tap water into crystal—perfect for an Old Fashioned, Negroni, or a tall, sparkling highball. Let’s set up your cooler and make your freezer do something impressive.
Why Clear Ice Matters (and Why Cloudy Ice Happens)
Clear ice isn’t just a party trick—it changes how your drink looks, tastes, and dilutes. Big, transparent cubes or spears melt more slowly, so a Negroni stays bold and structured instead of turning watery halfway through. In a tall highball, a single clear spear keeps bubbles tight and the profile crisp. Visually, clear ice reads “professional”: it frames the cocktail, lets colors pop, and gives you that glossy, postcard finish.
Cloudiness comes from air and impurities trapped as water freezes in many directions at once. In a typical tray, ice starts forming from the coldest surfaces—sides, bottom, and top—racing inward. Those converging fronts squeeze dissolved gases and minerals into pockets, which become white “snow” and stress lines. Agitation (moving the tray) and fast freezing amplify the problem. Odors and freezer burn add a faint stale note that shows up most in spirit-forward drinks.
Directional freezing fixes the root cause by controlling the direction and speed of the freeze. Instead of many fronts colliding, you create one steady front that pushes bubbles and haze down and out of the portion you’ll use. The result: blocks that are clear where it counts, with a sacrificial cloudy layer you can stop before or trim away. That clarity pays off immediately: slower melt, cleaner flavor, and a “bar ice” look—without the bar’s equipment.
How Directional Freezing Works—The Simple Science
Before you pull out a cooler, it helps to know why the method works. Water freezes clear when you freeze slowly from a single, uninsulated face. By insulating every side except the top, you force the cold to enter only from above. The surface sets first, and the freeze front travels downward at a measured pace. As crystals grow, they reject air and impurities, which get pushed ahead of the front into the still-liquid layer. That concentrated “waste” ends up at the bottom—away from the clear slab you’ll keep.
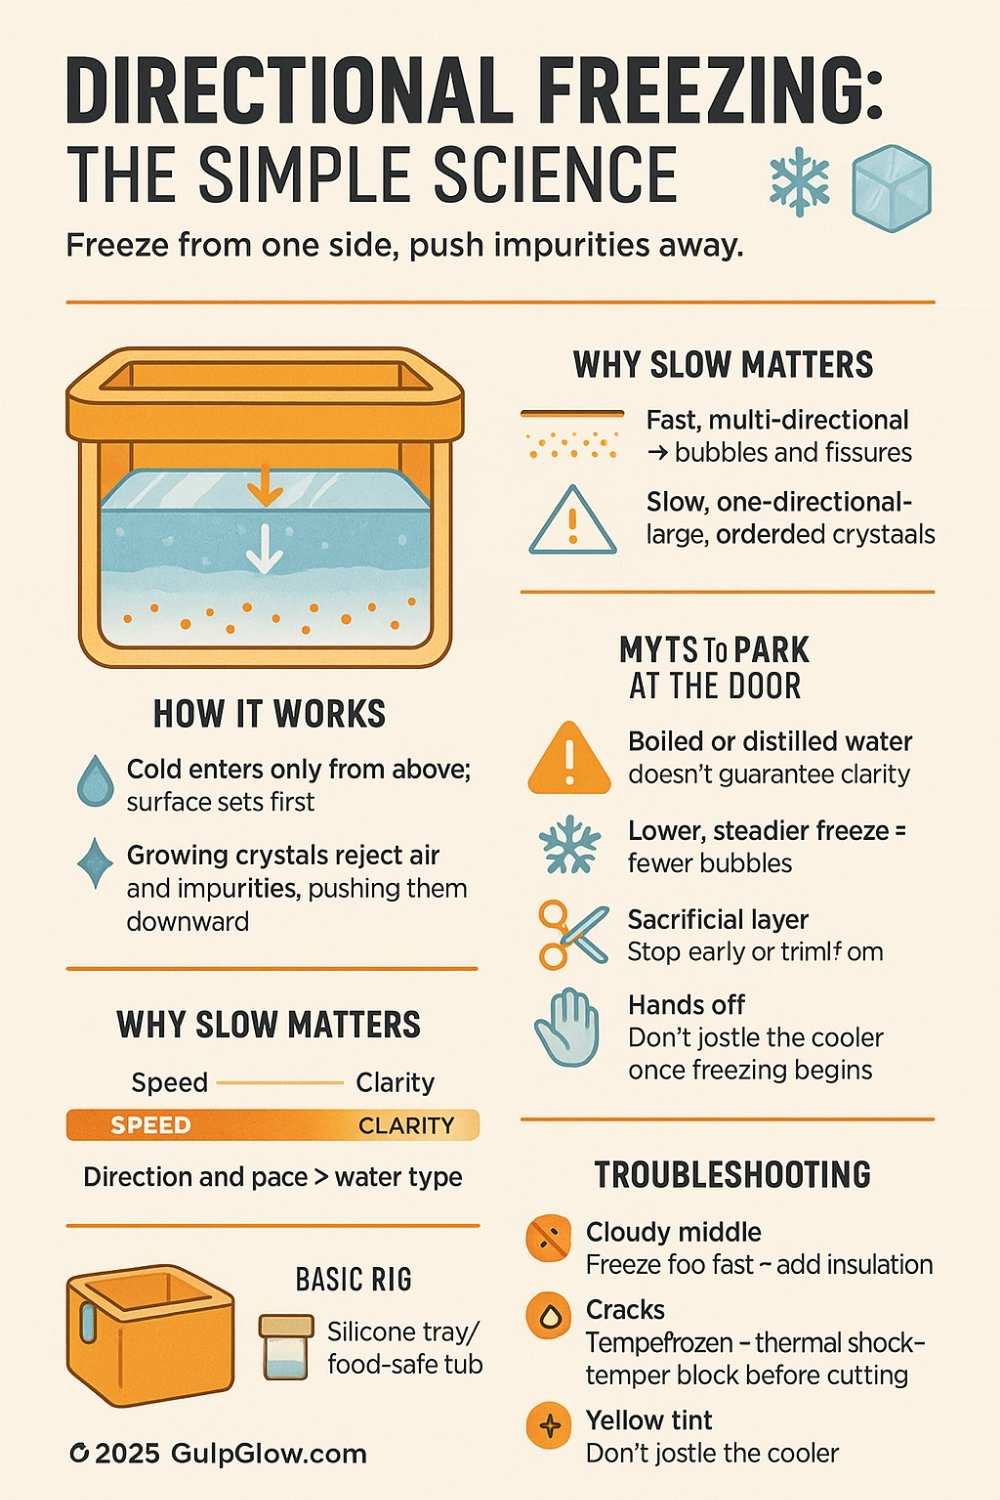
A couple of myths to park at the door: boiled or distilled water doesn’t guarantee clarity. You might see a small improvement, but if the freeze is multi-directional or too fast, you’ll still trap bubbles. The speed and direction of freezing matter far more than water type. Also, you don’t need to seal the container; in fact, you want the top open so it’s the cold path.
Give the process time. Slow freezing forms larger, well-ordered crystals that don’t scatter light. Rush it, and you’ll trap microbubbles and fissures. Keep the setup steady—no shaking or repositioning mid-freeze—so the front advances smoothly.
Key principles to remember
- One-way cold path: Insulate sides and bottom; leave the top exposed.
- Go slow: Lower, steadier freeze = fewer bubbles trapped.
- Sacrificial layer: Expect a cloudy bottom you’ll stop before or trim off.
- Hands off: Don’t jostle the cooler once the freeze begins.
The Cooler (Insulated Container) Method—Step by Step
Here’s the reliable, no-mold workflow that turns a normal freezer into a clear-ice maker. You’ll use a small picnic cooler or insulated lunchbox with the lid off so the top stays as the cold entry point.
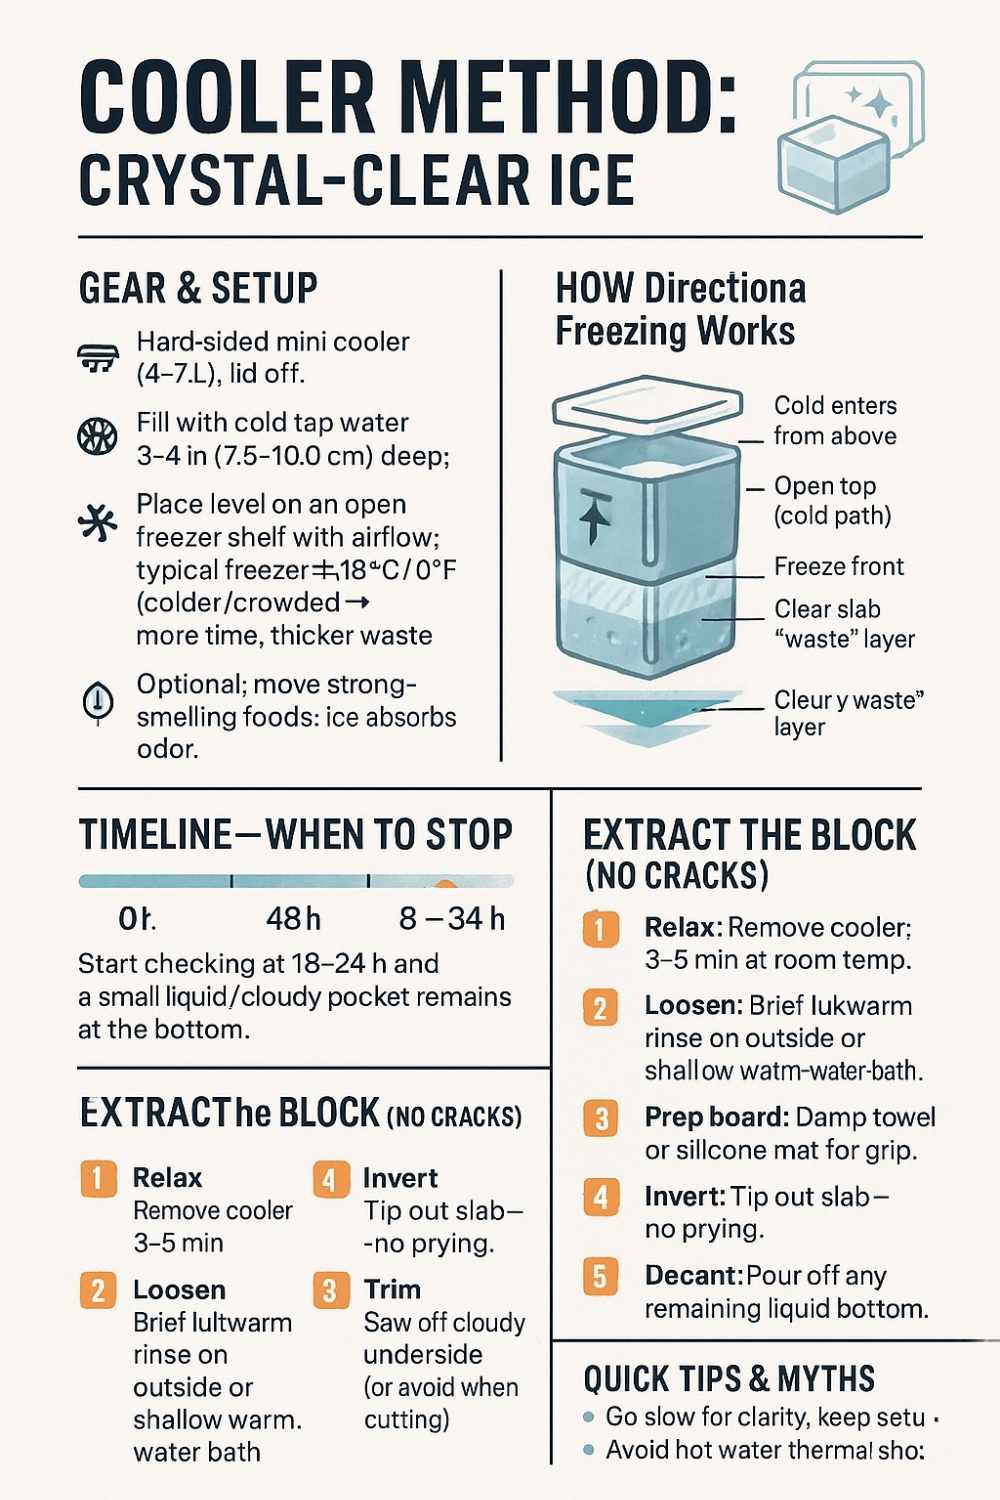
Gear & setup
Use a hard-sided mini cooler (roughly 4–7 liters). Rinse it, then fill with cold tap water to a depth of 3–4 inches (7.5–10 cm). More depth yields taller blocks but takes longer and increases the cloudy waste layer. Set the cooler level on an open shelf in your freezer, lid off, with a bit of airflow around it. Typical home freezers sit around –18 °C / 0 °F; if yours is packed or much colder, expect longer times and a slightly larger waste layer. Optional but helpful: pre-filter odors by storing aromatics (like onions) elsewhere; ice absorbs smell.
Freezing timeline & when to stop
Plan on roughly 18–36 hours, depending on depth, freezer performance, and cooler insulation. Start checking at 18–24 hours. You’re looking for a clear, solid top slab with a still-liquid pocket at the bottom (you’ll sometimes see a faint, cloudy zone). Stop before the block freezes solid—that preserves clarity by leaving the concentrated bubbles in the unfrozen bottom. If you overshoot and it freezes solid, no crisis: you’ll trim off the bottom later.
Extracting the block (without cracks)
Remove the cooler and let it sit at room temp 3–5 minutes to relax the sides. Run a brief lukewarm water rinse over the exterior or set the cooler in a shallow warm-water bath to loosen. Place a damp towel or silicone mat on your cutting board for grip, invert the cooler, and ease out the slab—no prying with force. If a thin cloudy bottom layer remains liquid, pour it off before inverting. You should now have a clear block with a cloudy underside you can saw off or avoid during cutting. From here, you’re ready to portion into cubes or spears, then store and temper for service.
Cutting the Block into Cubes & Spears—Clean, Safe, Consistent
You’ve got a clear slab—now the goal is portioning it into uniform pieces that fit your glassware and survive service. Cutting is where most cracks, chips, and injuries happen, so set up a stable station and move with intent rather than force.
Tools & safety checklist
Lay a non-slip mat or damp towel under a sturdy cutting board. Wear cut-resistant gloves and eye protection (chips fly). A serrated bread knife is ideal for scoring; a rubber mallet or the heel of your hand helps “tap” breaks along a score. Keep a thin saw (bread knife works) for gentle through-cuts, and a long offset spatula or bench scraper to lift pieces without prying. Have a room-temp towel handy to wipe meltwater so the slab doesn’t skate.
Methods: score-and-tap vs gentle saw-through
For clean edges, score first. Mark a grid lightly with the serrated knife, then deepen each line with several firm passes until you feel a track. To split, hold the knife in the groove and tap the spine with your palm (or mallet) so the block snaps along the score—don’t twist. Use the same approach for spears: score lengthwise, then snap. If a section resists, switch to short, shallow sawing strokes; long aggressive strokes create spalls. Keep the cloudy underside as the off-cut: start your grid in the clearest portion and work downward so the waste layer gets trimmed away last.
Sizing guide by drink
- Old Fashioned / Negroni (rocks): ~2 in / 50–55 mm cube. Aim for cubes that sit just below rim height.
- Highballs / Collins spears: length to match the interior height of the glass (usually 130–140 mm), thickness 30–35 mm so carbonation can flow around it.
- Large cubes for double rocks: 60 mm if your glass allows—slowest melt, dramatic look.
Plan your grid from the top view: a 4–5 L mini-cooler filled to 3–4 in often yields 8–12 two-inch cubes or 6–8 spears, depending on waste trimmed. Work steadily, wipe meltwater often, and place finished pieces straight onto a chilled tray for storage (next section).
Tempering for Crack-Free Service (and Better Mouthfeel)
Crystal-clear ice is brittle straight from the freezer. If a very cold cube meets room-temp booze, it can spider-crack on impact and shed shards. Tempering—letting the ice warm slightly—reduces thermal shock, preserves edges, and produces that satisfying “quiet chill” instead of violent cracking.
How long to temper (by size & conditions)
Bring portions from the freezer to a cool counter (not under hot lights). Typical room around 20–22 °C / 68–72 °F:
- Small/home tray cubes: 1–2 minutes until a soft sheen appears.
- 2-inch cubes (50–55 mm): 3–6 minutes; they’ll look slightly wet but not sweaty.
- Highball spears: 5–8 minutes; pick them up—edges should feel tacky, not icy-dry.
Use visual and tactile cues over the clock: a thin condensation sheen forms; the cube no longer squeaks on the board; tapping with a spoon sounds duller (less glassy). In hot rooms or outdoor service, temper faster but keep pieces shaded to avoid over-softening. For batching, move ice from deep freeze to a holding box in the fridge for 20–30 minutes; you’ll get a larger window of crack-free service.
What happens if you skip it
Expect star cracks, flaked edges, and micro-shards that accelerate dilution and can scuff clarity. Over-tempering has its own cost—sweaty surfaces stick to each other, and you can lose the crisp faces you just cut. The sweet spot is a cube that’s cold and rigid but no longer brittle. Build this pause into your drink flow: pull ice, set up glass and garnish, measure and shake/stir, then add the tempered cube right before the pour.
Storage That Keeps Ice Clear (Odors, Frost, and Service Readiness)
Clarity is earned in the freezer—but it’s lost just as easily to odors, frost, and abrasion. Proper storage protects your work and makes service smooth when guests arrive.
Short- and long-term storage
Stage finished pieces on a pre-chilled sheet pan and slide the pan into the freezer to set (15–30 minutes). Then transfer to airtight containers: deli tubs or lidded hotel pans are perfect. Separate layers with parchment so faces don’t fuse. Keep containers away from aromatic foods (ice absorbs smell) and avoid open boxes that invite frost. If your freezer cycles hard (frosty air), double-bag containers or use a small cooler inside the freezer as a buffer. Rotate stock first-in, first-out; label with date, size, and intended drink (“2-in cube—Old Fashioned”).
Pre-portioning & quick refresh
For party service, pre-portion one cube per rocks glass and one spear per highball, stored in separate labeled boxes. Pull a container at a time to minimize door-open humidity. If faces appear slightly scuffed, briefly rinse individual pieces under cold running water and wipe with a clean bar towel before tempering; this removes frost and reveals the glass-like sheen. Don’t rinse then refreeze—surface water will cloud. Finally, store a small odorbuster rule: no onions, garlic, or open bread in the same compartment as your ice. Protecting aroma is part of protecting clarity.
With a clean storage routine and a tempering habit, your clear ice will look the same on serving day as it did the moment you cut it—ready to make an Old Fashioned, Negroni, or tall highball look (and perform) like it came from a serious bar.
Troubleshooting: Cloudy Tops, Trapped Bottoms, Bubbles & Rings
Even with a good setup, real freezers behave like… real freezers. Before you change everything, diagnose the pattern you see and fix the smallest variable first.
Common issues & fixes
- Snowy cap on top: Your freezer is blasting cold air directly at the surface or you filled the cooler too shallow. Fix: Move the cooler away from vents, add depth (3–4 in / 7.5–10 cm), and avoid opening the door mid-freeze.
- Cloudy bottom that creeps upward: You let the block go solid. Fix: Start checking earlier (18–24h). Stop while a small liquid pocket still remains at the bottom, or be ready to trim the base after extraction.
- White rings and bubbles inside: Usually from vibration or sudden temperature swings. Fix: Level the cooler on a non-vibrating shelf; don’t slide it during freezing; keep the lid off (you want the top to be the cold path).
- Edge cracking on extraction: You rushed the release or used hot water. Fix: Give the cooler 3–5 minutes at room temp, then a brief lukewarm rinse on the outside only; never shock the block.
- Odor pickup / “freezer taste”: Ice absorbs smells. Fix: Store finished cubes in truly airtight containers; relocate aromatics (onions, garlic) and open bread away from your ice zone; don’t leave blocks exposed.
- Spears that won’t fit glasses: Plan backwards from glass interior height. Score to size first; test one piece; then finish the batch. Keep a “trim bin” for small cubes and pebbles—great for shaking.
Start a simple log (depth, time, result). Two or three cycles are all it takes to dial in your freezer’s personality.
Optional Gear & Variations (If You Want to Tinker)
The cooler method wins on cost and reliability; still, you can tweak it for speed, yield, or shape once your basics are tight.
DIY inserts & nested insulators
Lining the cooler with foam panels or using a smaller insulated lunch box inside a larger cooler tightens the freeze path and can sharpen clarity. A coffee-filter “chimney” at the bottom (with an exit hole) encourages gassy water to migrate away—useful in quirky freezers. Keep the top open; you want the cold to enter only there.
Molds & clear-ice makers
Directional “clear ice” molds (two-chamber designs) are convenient for single cubes/spears with minimal trimming. They’re faster but limited in quantity and size flexibility. Countertop clear-ice machines deliver volume but cost more and need space. Even with gadgets, directional freezing remains the core principle—insulate sides, freeze from one face, and accept a small waste layer.
Cutting upgrades
If you’re batch-producing, a fine-tooth Japanese pull saw, bench scraper, and food-safe rubber mallet speed things up. Keep strokes short and gentle. A cheap digital caliper helps keep spears uniform for tight highball fits. Resist power tools; they melt and haze edges.
Experiment one variable at a time. If clarity drops when you “optimize,” revert—simplicity is usually the most dependable path.
Visual Demo: Directional Freezing + Cutting (GIF/Video)
Seeing the full workflow once—freezing, releasing, and portioning—makes every step after that easier. Watch these two concise demos: one shows the cooler (directional) method, the other focuses on hand-cutting a block into clean cubes/spears. Then replicate the rhythm at home.
Recommended videos
- Directional freezing (cooler method): Making Crystal Clear Ice with a $12 Cooler.
- Cutting the block cleanly: Learn to Hand Cut Large Crystal Clear Cocktail Ice Cubes!.
- (Optional theory + variations:) Advanced Techniques – How To Make Clear Ice.
What to watch for
- Fill depth & placement: Cooler filled to ~3–4 inches, lid off, level on a shelf—this sets up a true top-down freeze.
- “Stop-early” cue: A clear top slab with a small liquid window at the bottom—pull now to keep the cloudy layer out of your block.
- Block release: Brief lukewarm rinse on the outside of the cooler, invert, and let gravity work—no prying.
- Score-and-tap technique: Shallow serrated score lines, then a controlled tap along the groove; avoid twisting or long, aggressive saw strokes.
- Tempering cue: A thin surface sheen before the cube hits liquid—prevents star-cracks on contact.
Record your first attempt and compare to the videos frame-by-frame—the small details (angle of the score, tap pressure, timing before service) are where clarity and clean edges are won.
Best Drinks for Clear Ice (and How It Changes the Sip)
Clear ice shines where presentation and dilution control matter most. Match shape to drink so the ice supports the experience instead of bossing it around.
Perfect pairings
- Old Fashioned (2″ cube): The slow melt keeps sweetness and bitterness in balance while the whiskey stays plush. Consider a final pass with an orange twist (see the “express citrus” post) to glaze the surface aromatically.
- Negroni (2″ cube): A heavy, jewel-like cube frames the color and reins in dilution so bitterness stays structured.
- Highballs / Collins (long spear): Tall, narrow spears keep bubbles lively and the profile crisp from top to bottom—ideal for G&T, Scotch & Soda, or a Collins build.
- Spirit-forward riffs (Boulevardier, Vieux Carré): Large cubes soften edges without flattening complexity, giving you a longer flavor arc.
Batch for parties: one container labeled “Rocks—2″ cubes”, another “Highball—spears”. Building with the exact ice shape you planned for the glass is the difference between “nice” and “dialed.”
Safety Recap (Please Don’t Skip)
The steps are simple; the risks are real. Ice is hard, slippery, and chips fly.
Do & don’t list
- Do wear cut-resistant gloves and eye protection when scoring/snapping.
- Do use a non-slip base under your cutting board; wipe meltwater often.
- Do use short, controlled strokes and snap along a scored groove—never twist.
- Do keep kids and pets out of the kitchen during cutting.
- Don’t pour hot water on the ice block; use lukewarm on the cooler exterior only.
- Don’t force stuck pieces—re-score or rest the block a minute and try again.
- Don’t store ice uncovered near aromatics; use airtight containers.
Five minutes of setup prevents cracked blocks and cut fingers. Make safety part of your ritual.
Summary & Quick-Start Checklist
Clear ice at home is a repeatable workflow, not a gamble. Here’s the whole process at a glance:
- Fill a mini cooler (lid off) to 3–4 in / 7.5–10 cm, set it level in the freezer.
- Freeze 18–36 h, then stop early when the bottom still shows a small liquid pocket.
- Release the block: 3–5 minutes at room temp, lukewarm rinse on the outside, flip onto a non-slip board.
- Trim the cloudy base, then score-and-tap into 2″ cubes or highball spears sized to your glass.
- Store airtight, layered with parchment; keep away from odors.
- Temper before service: 2–8 minutes depending on size, until a light sheen appears.
- Serve in the right drink: Old Fashioned, Negroni, or a tall highball—and finish with a precise citrus expression for the win.